Friday, June 29, 2012

Reverse Appliqué Tutorial

Okay, okay.  Nothing new here.  Reverse appliqué doesn't really need a tutorial.  But just in case...


To start, you'll need a shirt {or whatever} to appliqué on, a small little bit of Wonder Under {two-sided fusible interfacing} and the fabric you're planning to use.  I made my little guy a patriotic shirt, so I went with the classic flag pattern.


Now, you could probably skip this step and just pin the fabric onto the shirt.  But I have terrible luck with shifting fabric, so I always fuse it on.  You can't be too careful in the world of appliqués.  Haha.

Since this is a reverse appliqué, you only want to apply the Wonder Under to the very edges of the fabric.  You're going to fuse it to the right side of the fabric.  I just did a few sides, enough to hold the fabric in place while you sew.  Mine looked like this:


Then turn your shirt inside out and fuse the fabric in place.  Don't forget that you'll want it to be a mirror image of the final image, like so.


Then stitch around the image.  I was doing a flag, complete with stripes, so mine was kind of intricate.  In most cases, though, you'll really just need to stitch around the fabric.  After you stitch, flip your shirt around.

This part is my favorite.  Get your scissors and from the front of the shirt, cut inside your stitches to expose the fabric.  Just make sure you don't cut the fabric.


And that's it!  Super easy and fast!

Now my littles are ready for the 4th of July.


So full of sibling love...


Wednesday, June 27, 2012

Shirred Bubble Romper Tutorial

Good grief.  How is it the end of June?!?  One thing I love about holidays is making my littles some special outfits.  It just helps make a special day even, uh, specialer.  I got my ducks in a row this time and have the outfits done in time to share a tutorial.  Be impressed.


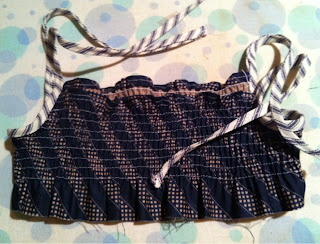
I have a serious obsession with the rompers that are so trendy these days.  I was thinking that maybe the Sunbean was too old for them, but I'm so happy I made this.  It's seriously adorable.  And easy!  In fact, I finished in one nap time with a cranky/sick toddler on my lap.  No exaggeration.  I love it because the top is shirred, so it's really comfy and easy to put on and take off.


I used four different fabrics, but it would be just as cute with two or even just one.  You'll need about 1/4 yard for the bodice, 1/2 yard for the bottom, and then some bias tape or scraps for the trim.

******************

First, cut out the pieces.  I'm no professional seamstress or pattern-maker, so this is in no way exact.

  For the bodice, measure around the child's chest, and then multiply it by about 1.5.  That will be your length.  I used a width of 5 inches, so go shorter for a smaller child and longer for a larger child.

Example:  Sunbean's chest is 21 inches x 1.5 = 31.5
I cut out one strip 31.5 x 5 inches.

Then you'll cut that strip exactly in half.  To make a space for the arms, just fold the ends together and cut out a little curve.  No need to be exact.


Then I took a pattern I had for shorts, and used the basic outline for the bottoms.  But make the top really long.  I just used the full length {or is it width?} of my half-yard.


Then you'll need to cut out the trim pieces.  I cut out a long strip {18 inches x 6 inches} to use for a sash.  You'll also need 64 inches {two 32-inch pieces} of bias tape.  The pre-packaged stuff is fine, but I cut some fabric on the bias to make my own.

So you should have a pile that looks like this:

Now for the sewing.  I started by making my bias tape.


Next you'll need to finish the top edge of both pieces of your bodice.  I turned mine under twice and stitched.

Then for the fun part:  shirring!  If you've never shirred with elastic thread, read up on Ashley's tutorial here.  Don't be scared.  It's fun!  You'll end up with two bodice pieces, nicely shirred and pressed.

The next step is to sew the bodice pieces together on the side.  If you have a serger, go ahead and finish the edges, too.


Now add one piece of bias tape to finish each armhole.  It's starting to come together!


Now for the bottom part.  Put the shorts together as you normally would, serging or otherwise finishing the edges.  You'll end up with a very high-waisted pair of shorts.
To finish the leg openings, just make a casing and pull some thin elastic through.


Almost done!  Now attach the bottom to the bodice.  You will probably need to slightly gather the bottoms to fit.  I got all fancy and topstitched the bodice, too.


To finish it off, I just added a little tie in the front.  Sew your tie piece in half, then flip and topstitch.


Tada!
All ready to run, jump, and play!


Tomorrow?  A {really!} quick project for your little man!

Today I'm...

...typing one-handed.  Sickly sleeping baby boy on my lap.

...trying to get this place cleaned up so that i don't feel like i live in squalor.

...planning to make a yummy and healthy pasta dish for dinner, but Jet's sounds much better.

...working on a tutorial for you - july 4th outfits for kiddos!

...thankful for air conditioning.

...wearing pajamas.

what are you doing today?

Monday, June 25, 2012

Funday Monday!


Monday already!  We had the silliest of weeks.  I decided at the last minute to go to my parents' house on Sunday night to see my dad for Father's Day, and then we found out on Monday morning that we'd need to be back in that area on Friday.  So I pretty much spent the whole week driving.  Awwwwwwesome.

 So at the beginning of the week we were at my parents'.  We played with some fun games, went out to eat, and even rode the penny horse.  Good times.  And a peaceful ride home.

 It was a hot one on Wednesday, so we spent the day at the pool.  We had it to ourselves {???}, which was awesome.  Then some cute little ducks decided to join us.

Friends of ours are moving, and I made the decision that me + my two kids would be more trouble that help.  So we made some yummy sugar cookie bars to deliver.  It was fun, and the batter {and cookies} were super tasty.

Then on Friday, we got to hang out with MacGuyver's parents.  His mom was babysitting for some kids, so it was great to have built-in entertainment for my kids.  Little Dude was loving the outdoor toys!

Did you have a fun week?  Do anything besides drive around the Midwest?  Link up and share!


Wednesday, June 20, 2012

Eye Swear

I'm about ready to gouge out my right eye.  

About 9 months ago, right when we moved here, I got an ulcer in my right eye.  Apparently those are normally caused from wearing your contacts at night, but I never do that.  At that point, however, I was wearing my contacts for 14+ hours per day, and getting about 4 hours of sleep per night.  Perhaps that had something to do with it.

Anyway...about 6 weeks of no contacts and really expensive eye drops, the ulcer was healed.  Ever since then, though, my eyes have just been fussy.  I recently had an eye infection that also required two weeks without contacts.

And yesterday, I went to the eye doctor {I imagine she's purchased a vacation home with all of my business this year} because my right eye was clouding up when I wear my contacts.  Like, to the point of zero visibility.  How nice.

She's such a sweet lady, and was so sad to tell me that my contact-wearing-days are probably numbered.  I've got another week of no-contacts and all sorts of drops every two hours, and then I'm going back to discuss daily contacts.  She warned me that they are very expensive.  Well, of course they are.  We're also going to discuss Lasik.  Years ago, I was told I'm not a candidate for Lasik because of my strong prescription {it's crazy bad} and my astigmatism.  But that was at least 10 years ago, so I'm hoping the technology has improved enough for me.

The big problem here is that I don't' like the way I look in glasses.  I feel like a frumpy old mom.


There's a Groupon for a pretty good deal on eyewear, so I think I might do that, because the other problem is that these new $500 glasses aren't my current prescription.  I can see fine, but it could {and should} be much better.

Well, if you're still reading, thanks.  I'm sure my vision issues are near the very bottom of your things-I-care-about list, but it's seriously bumming me out.  The good news is that I have a pair of prescription sunglasses {with my current prescription!} that I really love.  Maybe I'll just take to wearing these both inside and out.


Here's hoping you have an eyecare-drama-free day!

Monday, June 18, 2012

Funday Monday!


Welcome to Week 2 of the Fun Summer {mom} Challenge!  Hopefully everyone had a great week.  We started the week off with a lovely head cold.  I hate that kind of sickness...not sick enough to be 'sick', yet it still knocks you on your rump.  I actually escaped, but I still had to deal with crabby kiddos.

We did manage to do something fun and different everyday, though.

Again with the paint {sigh}.  The Sunbean was just really jonesing for some more paint.  We tried q-tip painting, and it was great.  No mess at all, and she loved mixing the colors with the q-tips.  A winner for sure.

We headed back to COSI on a rainy day.  Everyone had the same idea, and we had to park in {literally} the furthest parking spot in the lot.  We had a blast, and when we left it was pouring.  And we had a 10 minute walk to the car.  We made lemonade from our lemons though, and splashed the whole way to the car.  It was a loooooong and wet ride home, though.

This one was from Monday.  With a sick and sleepy Little Dude, the Sunbean and I made a fort and watched some Netflix.  It was so relaxing.  We've never done forts, and it was totally fun.  Also, that's a yoga mat doubling as a blanket.  Cozy?

This was such a great day!  We met our best friends down at the Scioto Mile, a lovely riverfront park downtown.  Between the three of us, we have 9 kiddos three and under, so we always make a scene.  It was such a blast to play in the water and eat lunch in the shade with them.  The kids and I also enjoyed the porch swings that line the river.  And I escaped without a parking ticket!

Friday was kind of a boring day for the kids...errands in the morning and then sheet shopping in the afternoon.  We spiced things up by stopping at Starbucks and getting Little Dude his very first milk box.  A rite of passage in this house.  He squeezed it and created a geyser of milk across the floor, of course, but still thought he was big stuff.

Link up and join in the fun!

Oh, and I created these fun pics on my phone with a combination of Camera+, Labelbox, and Pic Stitch.  All three are great apps.


Sunday, June 17, 2012

We Love Our


and all the other dads and grandpas in our lives.

happy father's day!

Wednesday, June 13, 2012

The Sum of My Inheritence

MacGyver and I recently inherited my grandparents' dresser.  My mom and I think they probably bought it when they got married, which would put it at around 60 years old {ish}.  It's seriously vintage.


I'm looking forward to refinishing it to match our bed and headboard.  I love the lines already, but it {obviously} needs a new color and some updated hardware.

Here are some ideas I've found:


Source: westelm.com via Abbey on Pinterest


That last one is my favorite.  I love the hardware especially.

And I love that it was my grandparents.  I'm excited to give it new life, but right now I'm enjoying the fact that our bedroom smells like my Grandma Jean.

Monday, June 11, 2012

Funday Monday!


How's your summer going?  We've had a really fun and really HOT week.  We spent a large part of last week getting ready for a weekend of house guests, which was totally fun.

But I did stick with my goal and cranked out a fun activity each day.  Go me.  Forgive me for the less-than-quality iPhone pictures.

We checked out the local library.  We've had a library card for several months, but we actually stayed awhile and explored.  It was fun.  I signed all three of us up for the summer reading program, too.

Tuesday afternoon was cloudy, so I thought it be a great day to go to the zoo.  We pulled into the parking lot....and it started to rain.  Our backup plan was Starbucks and COSI {the local science museum}.  It was just so much fun.  MacGyver's parents bought the kids a membership for Christmas, and we've been loving it.  Little Dude was really exploring things this time.  I just really love this toddler stage.

I've really been wanting to do some type of finger paint activity with the kids, and about 10 seconds into it, I remembered how much stinking work something like this is.  They had a blast, but it was just barely worth it.  There was an insane mess everywhere, inside and out {and all over all of us}, and I think Little Dude ate about a cup of the paint {I just used cornstarch, water, sugar, and food coloring}.  Do you see how red his hair is getting?

My parents came to town, so we were able to go to the zoo with them.  It was a hot, hot day, so we just stay for a couple of hours in the morning.  I'm so happy we have a membership so that I don't feel bad about it.  Despite the heat, we had a blast.  And got a workout pushing the stroller around in the heat!  Do you think these cute kids went home and took a good nap?  No.  No they did not.

One day, the Sunbean was just dying to get out the watercolors and tempera paint.  Again with the huge setup.  To busy my littlest, I filled up some freezer bags with colored hair gel {it's glittered, too!} and taped them to our big glass door.  Little Dude loves them.  And obviously so does Dr. Sunbean.

On Friday, my mom was in town, so she entertained my littles while I cleaned the house.  No pictures, but that's certainly a change of pace {the cleaning part!}.

So link up!  I'd love to hear about your ideas and how your kiddos liked the activity.  We can all use some fresh ideas.  Speaking of ideas, I get most of my ideas from what I remember from school + student teaching, and also Pinterest.  Obviously.

Have a fun week!


Tuesday, June 5, 2012

Pallet-able

When we moved, we needed a new mattress.  Like, really badly.  We were sleeping on MacGyver's grandmother's old mattress.  Mmmhmmm.

So we sprung for the king size, and it is fabulous.  Fab-u-lous.

My sweet parents bought us a platform bed for Christmas, and I've been wanting a headboard to finish things off.

I found a few ideas I liked on Pinterest, and my friend offered me the pallets she had.

Let's just say MacGyver was less than enthused, but played along as I put this thing together.  Here's the finished product.


I'm really happy with it!  It's certainly not perfect, but it was almost free.  I bought some nails and some wood paint, which brought me to a grand total of $9.

Basically, I had MacGyver break down the pallets, and then I used the circular saw to cut the boards down to the size I wanted.  I sanded them down {with the power sander thing}, and then very poorly nailed them together.  Seriously it was bad.  But it stayed together, so it works.

I bought some of that wood paint/stain stuff at ikea.  I kind of wish it was a little darker, but I didn't have enough to do two coats.  Maybe someday I'll take it down and do another coat {cue laughter}.


My favorite part is the juxtaposition of our modern bedding and furniture with the rugged wood from the pallets.  It's not perfect, but it was $9.  And I love it.