Good grief. How is it the end of June?!? One thing I love about holidays is making my littles some special outfits. It just helps make a special day even, uh, specialer. I got my ducks in a row this time and have the outfits done in time to share a tutorial. Be impressed.
I have a serious obsession with the rompers that are so trendy these days. I was thinking that maybe the Sunbean was too old for them, but I'm so happy I made this. It's seriously adorable. And easy! In fact, I finished in one nap time with a cranky/sick toddler on my lap. No exaggeration. I love it because the top is shirred, so it's really comfy and easy to put on and take off.
I used four different fabrics, but it would be just as cute with two or even just one. You'll need about 1/4 yard for the bodice, 1/2 yard for the bottom, and then some bias tape or scraps for the trim.
******************
First, cut out the pieces. I'm no professional seamstress or pattern-maker, so this is in no way exact.
For the bodice, measure around the child's chest, and then multiply it by about 1.5. That will be your length. I used a width of 5 inches, so go shorter for a smaller child and longer for a larger child.
Example: Sunbean's chest is 21 inches x 1.5 = 31.5
I cut out one strip 31.5 x 5 inches.
Then you'll cut that strip exactly in half. To make a space for the arms, just fold the ends together and cut out a little curve. No need to be exact.
Then I took a pattern I had for shorts, and used the basic outline for the bottoms. But make the top really long. I just used the full length {or is it width?} of my half-yard.
Then you'll need to cut out the trim pieces. I cut out a long strip {18 inches x 6 inches} to use for a sash. You'll also need 64 inches {two 32-inch pieces} of bias tape. The pre-packaged stuff is fine, but I cut some fabric on the bias to make my own.
So you should have a pile that looks like this:
Now for the sewing. I started by making my bias tape.
Next you'll need to finish the top edge of both pieces of your bodice. I turned mine under twice and stitched.
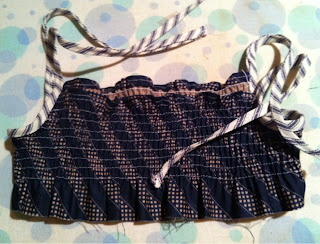
Then for the fun part: shirring! If you've never shirred with elastic thread, read up on Ashley's tutorial here. Don't be scared. It's fun! You'll end up with two bodice pieces, nicely shirred and pressed.
The next step is to sew the bodice pieces together on the side. If you have a serger, go ahead and finish the edges, too.
Now add one piece of bias tape to finish each armhole. It's starting to come together!
Now for the bottom part. Put the shorts together as you normally would, serging or otherwise finishing the edges. You'll end up with a very high-waisted pair of shorts.
To finish the leg openings, just make a casing and pull some thin elastic through.
Almost done! Now attach the bottom to the bodice. You will probably need to slightly gather the bottoms to fit. I got all fancy and topstitched the bodice, too.
To finish it off, I just added a little tie in the front. Sew your tie piece in half, then flip and topstitch.
Tada!
All ready to run, jump, and play!
Tomorrow? A {really!} quick project for your little man!


2 comments:
so cute! and perfect for this hot hot summer!
wow...fancy sewing. such a cute outfit.
Post a Comment